Showing posts with label Jin Soon. Show all posts

Red and Gold Gala

Tuesday, December 3, 2013

Hi!

Today I have some simple fall-inspired nails to present! 


On my ring finger is JINsoon Gala, a holiday-ish red-gold glittery topper; and on the other fingers is Nails Inc Tate and gold studs from Claire's. 

Movember/Gay Pride Nails

Wednesday, November 13, 2013

Hi!

It's Movember! You've probably heard quite a lot about Movember by now, but it's basically a month to raise awareness and funds for men's health issues (especially prostate cancer and other male-specific cancers). A lot of guys are growing out their moustaches this month, so I decided to grow a moustache too -- on my nails, that is. 

I didn't want to be normal and put them over a plain base, so I decided to do them over a rainbow gradient. Only after I finished did I realize "hey, these could be gay pride AND Movember nails all in one!" 

So I present to you my gay pride & Movember nails!

moustache nails

I used Sally Hansen Blue Me Away, Sinful Colors Timbleberry, Sally Hansen Mellow Yellow, and Sephora by OPI It's Totally Karma for the gradient, then added the moustaches with Wet n Wild Black Creme. On my thumb I decided to try Jin Soon Epidote, because it's an awesome duochrome polish that I really need to swatch soon! (it looks a little odd here though)


Movember and gay pride are both great causes, and moustache nails were -- of course -- really fun to do.


Are you planning on doing moustache nails this month? (or gay pride nails... even though I guess those would be more of a June thing?) 

Also, I really did mean to do pink nails last month for breast cancer awareness, and I did but somehow the photos disappeared from my computer and I had already removed them and didn't have time to re-do them... it was a mess. If I find them I'll definitely post them, though!

Thanks for reading! 
Lucy xx

Saran Wrap Nails

Friday, October 18, 2013

Hi!

This week I recreated some nail art my friend (hi, Jasmeen!) did! I loved the colors and the design, so I decided to recreate it on my nails as well!

Jasmeen's Nails

For my thumb, index, and pinky, I started with a base of Sally Hansen Mint Sorbet and added the dots with a bobby pin and Wet n Wild Black Creme
For my middle and ring fingers I started with a white base (Revlon Spirit) then used the saran wrap technique with JINsoon Coral Peony, Deborah Lippmann Lara's Theme, and Sally Hansen Mellow Yellow. Then I freehanded the black on either side with Wet n Wild Black Creme. (this was with my non-dominant hand, guys!)

nail art

(apologies for the gross brown/white paint on my hand, I was using brown acrylic paint and forgot to wash it off)

nail art

This was my first time using the saran wrap method and I thought the technique produced cool results! I'm trying to think of more ways I can use this... ideas? I liked the Crumpet's candy striped nails and although she used a different technique I think it would work with the saran wrap method as well!

Do you like this? Do you think the saran wrap/black nails go with the mint green nails, or is it not your kind of thing? Tell me what you think :)

Thanks for reading! And thanks Jasmeen!
Lucy xx


Nude Dotticure

Thursday, October 3, 2013

Hi!

Happy Thursday! This week on my left hand I decided to do a simple dotticure (at first I tried some nail art, but that was a complete failure... I wish I had taken photos so you could laugh at them!).


This was a really quick and simple design to do. I started with a base of Sephora by OPI Neutral Beauty, then added dots in Sephora by OPI Mood Ring (green), Sally Hansen Mellow Yellow, and Jin Soon French Lilac


What do you think of this design? Do you like the colors, or are they too mismatched? And what do you think of Neutral Beauty (I'm still undecided as to whether it's more of a nude or a brown)? 

Thanks for reading!
The Nail Snail xx

P.S. I accidentally deleted ALL of your lovely comments from about a month ago until now *sob* ARGH! Lesson learned: don't mess with your blog's settings. You guys should leave lots of comments now to make up for the deleted ones :) 


Tree Nails

Tuesday, October 1, 2013

Hi!

I've been admiring nails based on the Arizona tea bottle tree thing for a while (if that made any sense). I also wanted to swatch Fake It Til You Make It (of the Deborah Lippmann Jewel Heist collection). I feel like pure swatching posts are kind of boring to write (I like reading them -- I just don't like writing them for some reason!) so I combined the swatches and did some Arizona tea nail art on top of them!

tree nail art

I used WnW Black Creme and a small striping brush to do the trunks, and then Jin Soon Coral Peony and Tea Rose for the flowers.

I have to admit that these didn't come out quite like I originally wanted. My trunks were kind of wobbly and the black dots in the middle of the flowers were SUPPOSED to be stamens...whoops... But even though they weren't quite what I wanted, I still like them!

I think it's time to acquire a black striper, though. Striping brushes are just difficult to work with. Plus, mine were of the cheap variety so they're losing hairs and generally falling apart (although I guess I can't complain, $1.36 was a good price for three brushes).  

tree nail art

And since I also did these to see what Fake It Til You Make It looks like, here it is (2 coats, no base color): 

fake it til you make it

It's a mix between a glitter and a shimmer. It dries textured, like glitter, but as you can see it's not really a glitter polish (its finish reminds me of washi paper!). It has these green flecks that I like, but it makes the polish seem more green and money-ish than warm and gold-colored. I guess the flecks of green are supposed to make it match with the collection, but it's a bit too green for me!

Do you like the tree nails? (see Cutepolish's tutorial if you do!) And would you recommend a black striper, or are detail brushes just as good?

Anyways, that's it for today! Hope your weeks are going well -- we're halfway to the weekend (almost)! Thanks for reading!

The Nail Snail xx

Tribal Nails

Saturday, September 28, 2013

Hi!

This week, I did tribal nails. I've been wanting to try out tribal nails for a long time, but I never felt I was good enough to actually pull them off. But after seeing all of the amazing tribal nail designs for the 31 day challenge, I finally forced myself to give them a try -- to my surprise, they didn't turn out as a huge black and white gloopy mess! Success!


I was short on time (well, to be honest, I was just feeling lazy... it was one of those days) so I only did one nail with tribal print. 


I used Jin Soon Blue Iris for the non-accent nails, then used Sally Hansen White On and WnW Black Creme for the tribal design.

I was actually very happy with how these turned out! I love this look -- and they were very fun to do -- so I'll definitely be trying out some variations on these sometime. There are so many amazing variations -- check out Chalkboard Nails' & Hey, Nice Nails' versions!

What do you think of tribal nails? Are they something you'd love to have on your nails, or do you think they're tacky and lamely retro? 

Thanks for reading!
The Nail Snail :)

P.S. I am SO impressed with all of you bloggers who are doing the 31 day challenge! You guys are amazing and giving me so much nailspiration! 

Dandelion Nail Art and Jin Soon Tea Rose

Tuesday, September 17, 2013

Hi!

I've broken today's post up into two parts: nail art, and then swatches (because of my photography non-skills... more explanation to come!)

Part 1: Dandelion Nail Art
This week I did dandelion nail art. I've been wanting to do this design for a long time and I finally got around to it!

dandelion nail art

I started with the pink base color, Jin Soon Tea Rose, then drew the flower stem with a detail brush and Wet n Wild Black Creme. Last, I added the white petals with Sally Hansen White Out

My photos are a little weird this time, apologies! I don't know why, but my camera kept making everything dark, and it looked weird when I pumped up the brightness in Photoshop... digital cameras, sigh. I did want to make the flower a little more circular and dandelion-y, but that didn't work out so well. Besides that, I'm pretty happy with what I came up with! 


Part 2: A Mini-Swatch and Review
I was originally intending to do a separate post on swatches for this polish because I like it so much, but I only took one good photo before I did the nail art so I figured it wasn't really worth it. Ugh, starting to hate my camera!

Anyways. The base color for this design, Jin Soon Tea Rose, was actually sitting in my untried pile, despite it being a very expensive and high-quality polish! I'm glad I tried it out for this design. On the product site, it's described as an "unusual light coral pink that is startlingly sweet and feminine". I think that pretty much captures it!


Besides it being a beautiful color, it was also very fun to apply. Like all Jin Soon polishes I've tried, it applies beautifully -- no streaking, opaque in two coats, excellent brush... pretty much everything you'd want in a polish.

The only issues I had were (1) that it dries about 3 minutes slower than average polish and (2) when it does dry it has a kind of rubbery jelly texture that makes you feel like the polish will just come right off any minute (it doesn't though!). However, both those problems can be solved with a coat of Seche Vite so I wouldn't say they're major issues.

What do you think of this polish? What do you think of this nail art design? Also, do you have any tips on making sure that your skin/background are a consistent color in every photo? (I don't have a lightbox but I'm planning to make one myself when I get time)

Thanks for reading!

The Nail Snail :)

Gradient Nails

Sunday, September 8, 2013

Hi!

This week's nail art has been inspired by Tyeisha from the Lacquernerd (see her post)

I don't have much to say about this mani -- it's pretty simple and was very easy and fast to do (and I have to do my precalc homework and lab report, bleh).

gradient nails

National Day of... Challenge: Cupcake Day Nails

Tuesday, August 20, 2013

Hi!

So yesterday I got an email from Colleen of Dream It Up Nails, inviting me to join the National Day of.. Challenge! I'm a bit late with this... yesterday (the 19th) was National Cupcake Day, but I didn't get the email until too late yesterday and there was soccer and flute and SAT prep to be done.

But I thought cupcake nails were just too fun of an opportunity to pass on, so I changed my plans of doing back-to-school nails (apples) and changed it to cupcakes! (Apple nails are hopefully coming next week) I haven't been very creative with this theme, but... well... cupcakes are pretty cool.


The blue with the DL polish over it (my not-so-awesome left hand)

The Process: I started with blue that looked a lot lighter in the bottle than it actually is, Jin Soon Poppy Blue. I had forgotten how dark the blue actually was, so I was a bit dismayed when it turned out to be kind of a dark turquoise instead of a, well, poppy blue. To try and fix the mistake, I covered it over with a coat of Deborah Lippmann When Lightning Strikes, a lovely glitter polish with a mix of midsized white glitters and silver microglitters (these are hard to describe. They're kind of like flakies... kind of). It made the blue a lot softer and more satin-y -- success! It went pretty smoothly from that point, except when I accidentally rubbed off the polish on a couple nails and had to re-do them. I used a mini striper for the dark pink stripes and a bobby pin (my makeshift dotting tool) for the icing. Overall it was a very fun design to do!

Polishes Used:
BK #11 (purple dots)
Deborah Lippmann Scream & Shout (dark pink)
Deborah Lippmann When Lightning Strikes (silver glittery)
Jin Soon Poppy Blue (base blue color)
Sally Hansen White On (white)
Wet n' Wild Tickled Pink (light pink)

Tutorials/Other Versions:
Once again, this design is pretty self-explanatory but Lacquerheads of Oz has a nice tutorial. I also liked Swatch and Learn's version. Oh, and of course Cutepolish has her video too!

Thanks for reading and let me know what you think!

The Nail Snail

Mani Thursdays 2: Watercolor Nails

Thursday, August 8, 2013

Hi!

Well, it's Thursday again! I had been wanting to try watercolor nails for a while, because it seemed so simple and fun to do. At first, I tried it with plastic wrap (as Polish and Pearls did) but it didn't turn out so great. So I switched to using acetone to water down the polish, as rebecca likes nails did, and then kind of swirled it around with a small paintbrush. Many of the watercolor manis I looked at used really bright colors, which I thought looked a little... bleh, so I decided to use pastel blues and greens.

This worked much better! I probably watered it down more than rebecca likes nails, but it turned out just fine. On the ring finger, I did a more organized striped pattern. I'm not sure which I like better, the stripes or the random blobby things. What do you think?

Also, I realized that I had used all the polishes in this mani in the argyle nails... And I still have so many polishes I need to try! *sigh* But I really love the Sally Hansen Mint Sorbet, so I guess that's my excuse?

watercolor nails

watercolor nails

Polishes Used:
Sally Hansen White On (white base)
Sally Hansen Mint Sorbet (light green)
Sephora by O.P.I. Read My Palm (darker green)
Jin Soon Blue Iris (blue)

Tutorials:
rebecca likes nails (pictures) 
Nail Art 101 (has a video as well as pictures)


Argyle Nails

Tuesday, August 6, 2013

Hi!

Today my friend and fellow blog contributor came over and reluctantly let me do her nails (we also dug the pond, but that's another story). I decided to do a pretty challenging pattern (for me, at least) -- argyle nails.

We had tried this pattern a few weeks earlier, without brushes or stripers or anything, and it was a complete failure. This time it was much improved, although the lines could be better... oh, well.

Argyle Nails

argyle nails

Polishes:
Sally Hansen "White On" (white);
Sally Hansen "Mint Sorbet" (light green);
Sephora by O.P.I. "Read My Palm" (dark green);
Jin Soon "Blue Iris" (dark blue);
Jin Soon "Poppy Blue" (light blue);


Tutorials:
Cutepolish's tutorial is the best! But if you don't like videos, Kelsie's Nail Files has a similar tutorial

- the Nail Snail

Galaxy Nails, again

Saturday, August 3, 2013

This might be redundant, but... my mom is taking a photography class and so I got her to take a few pictures of my nails. This was the best one:
Galaxy Nails
- the Nail Snail :)

Mani Thursdays 1: Galaxy Nails (Tutorial)

Thursday, August 1, 2013

Hi! Here's the first post on this blog and the first Mani Thursday. OK, enough pointing out the obvious.
I've done galaxy nails this time because they a) seemed fun to do, and b) seemed fairly easy, which is a major requirement for me.
There are quite a few versions of galaxy nail art out there. I loved Pretty (Squared)'s version but it seemed very difficult. I ended up doing a sort of mixture of Nail Art 101's version and Polish and Pearl's version, with the inspiration for the white stars coming from the Nailasaurus' pastel galaxy nails (which I'll have to try sometime, except I don't have the right colors).
I'm only going to be posting on here once or twice a week, so I thought I might as well do a tutorial -- I mean, just posting a picture once a week seems a little lazy (plus, that's kind of what I'm doing for my Wordpress blog). But enough of me talking. Here we go! (oh, and there aren't photos for the first 2 steps because the photos came out terribly, so I was like "well... blah, I'm not putting those out there")
Materials used:
Tools: Sponge (I used one of those huge sponges you use to wash cars); nail art brush (a thin one!)
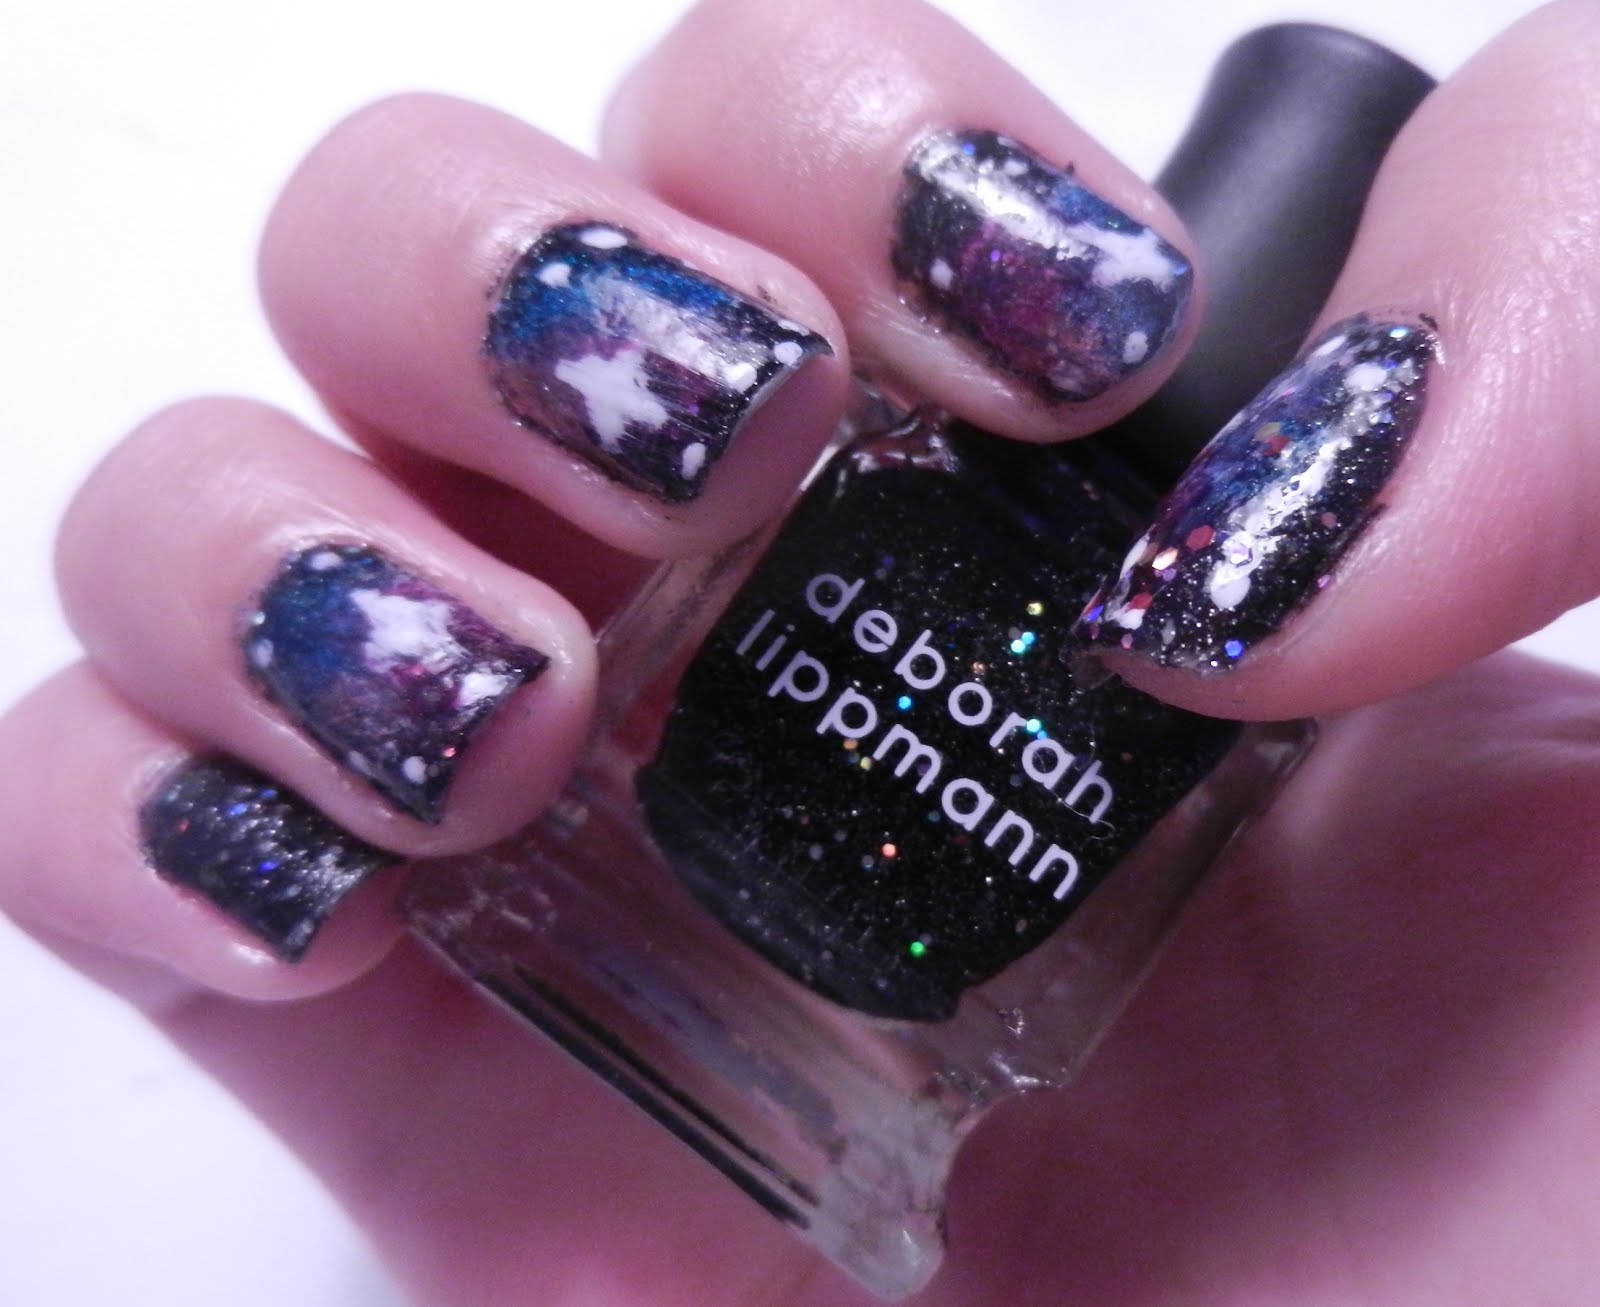
Polishes: Revlon base coat; Sally Hansen top coat; Deborah Lippmann Twilight Tone, I Fought the Law, and Invincible; Sally Hansen White Out; Funky Fingers Mood Ring; and Jin Soon Coral Peony

Step 1: paint on a base coat and an opaque coat of black polish (it can have sparkles or not, it doesn't matter; I used black sparkly polish because I don't have plain black).
Step 2: sponge on some white polish in one area. Try not to make it like a huge glob of white in the middle of the nail, which is what happened for me my first try. Sponge it on lightly, not in a circle, and not in the center of the nail.
Step 3: sponge on some green/blue polish (optional). I didn't do this for my first two nails and I don't think it makes a difference, but I had this perfect green/blue sparkly polish that I really wanted to use, so...


Step 4: sponge on some dark blue polish somewhat overlapping with the white. Don't completely cover the white, but make the two colors overlap. Try blending them together with a fresh piece of sponge -- you don't want harsh lines between the colors.


Step 5: sponge on some violet polish, also somewhat overlapping with the white and pretty close to the blue. There should still be a fairly large area of uncovered white. Once again, try to soften the lines between the colors with a fresh piece of sponge.


Step 6: sponge on some orangey-pink, on top of the remaining showing white. For the last time, try to soften the lines between the colors. You'll want this pink to be significantly different from the purple you use, so that it'll stand out a little.


Step 7: add some white starry-like dots on the remaining showing black.


Step 8: add a star somewhere in the purple-blue-pink cloud (this was the hardest part... argh, my hand shakes so much!)


Step 9: top coat! Then remove excess polish with a Q-Tip (or a cheap generic equivalent!)
Step 10: admire nails and take pictures!

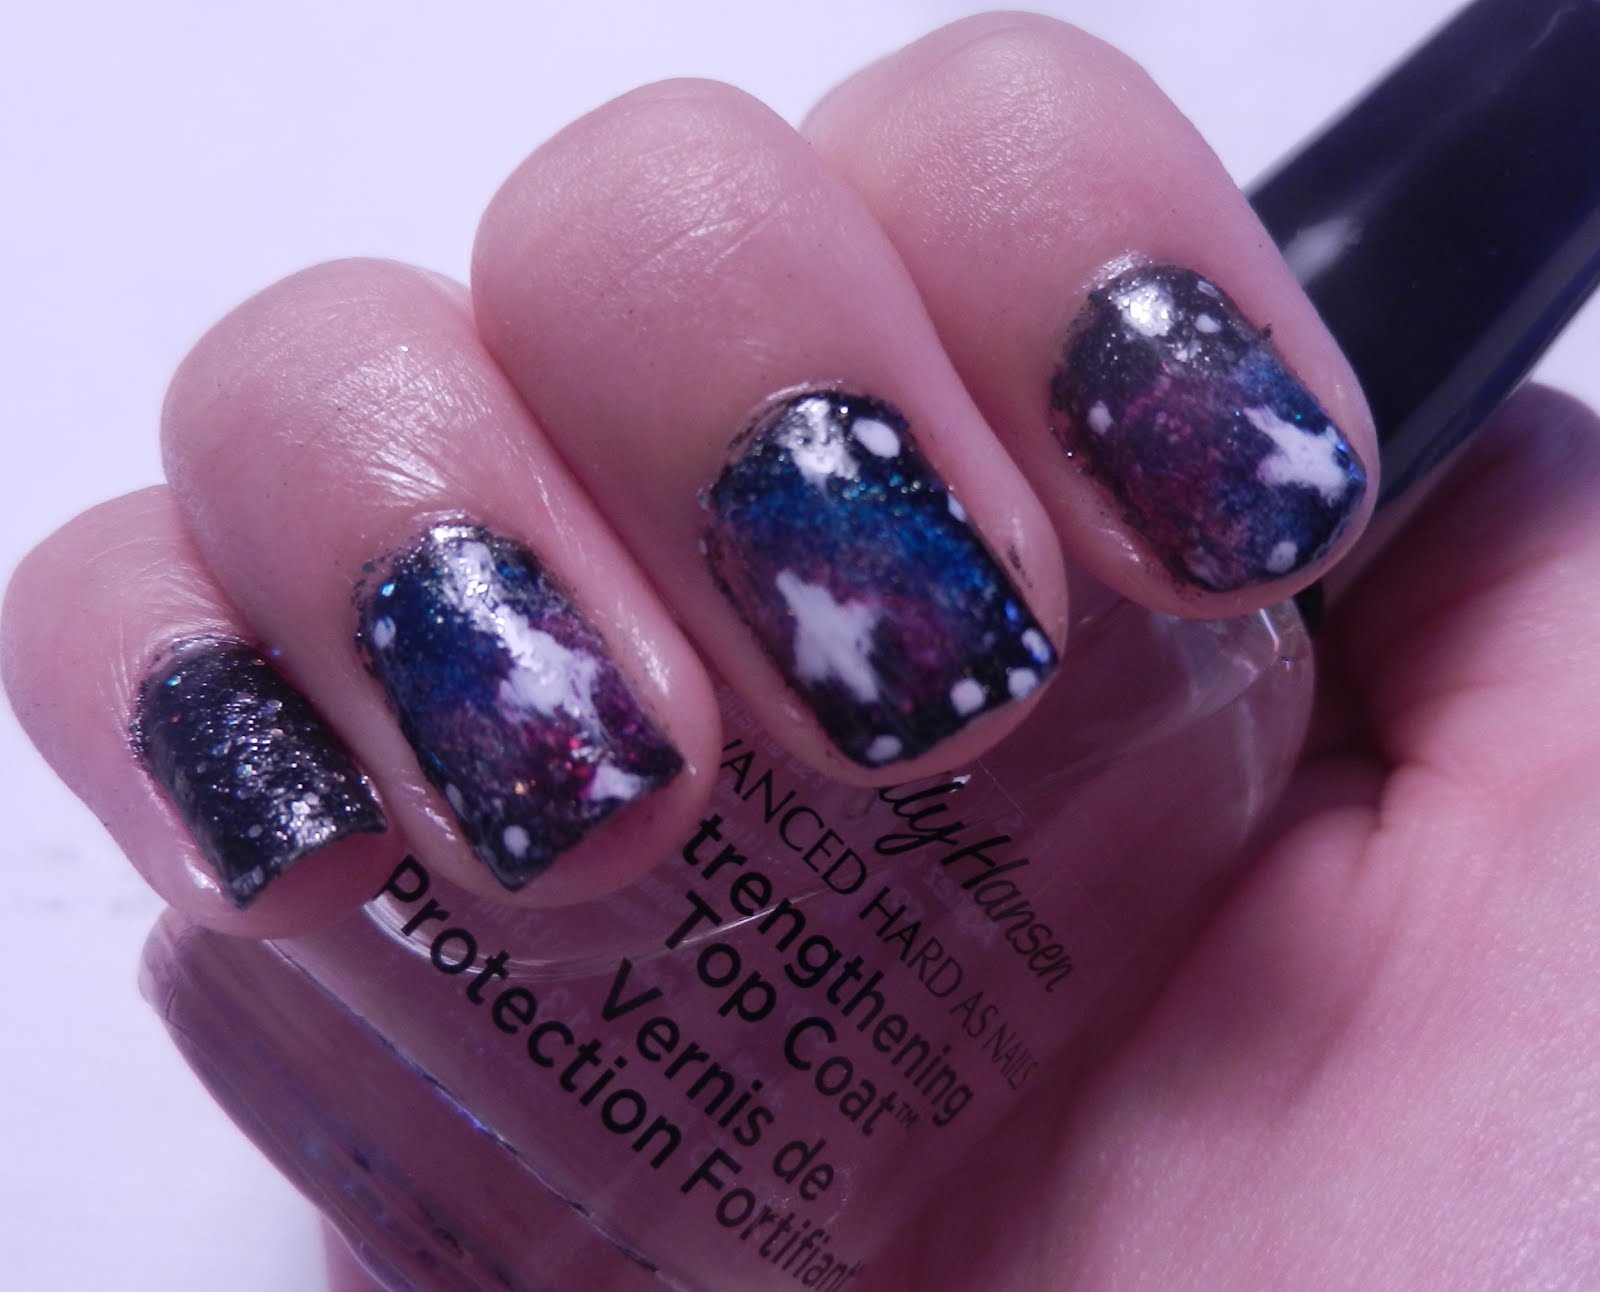
This design is pretty much explained by the pictures, though, so you can just skip over all the wordy instruction things that are really not very helpful.
Helpful tip: listen to music while doing this. It makes it so much better (and it stops me from constantly feeling my nails -- "are they dry yet? How about now? Or now? Or... argh, now I have to redo them!!"). Actually, listening to music makes a lot of things better. So... listen to music all the time? Except when you're practicing your instrument -- oh, never mind. Blah. This tip was not very helpful.


But anyways, hope you like it :)
The Nail Snail