Pumpkins!

Wednesday, October 30, 2013

Hi!

I finally got around to doing some Halloween nail art! 

I wanted to try some Halloween splatter nail art but I didn't have a straw, so I decided to do some freehand stuff instead!

The glossy version
I started with a base of Deborah Lippmann Lara's Theme, added some light orange stripes with acrylic paint, then added the faces/leaves with Wet n Wild Black Creme and a green polish I can't find (yeah, I am disorganized...). 

I think these came out pretty well -- my lines aren't very crisp, but you can tell they're pumpkins! I had a little accident with the face on my middle finger but I didn't have time to redo it.

The matte version
And of course I had to try them matte as well!

I have a bunch of Halloween designs on my to-do list but somehow I kept delaying them. I guess I"ll just be that person who keeps doing Halloween nail art until December! 

What has been your favorite Halloween nail art so far? I definitely want to try ghosts! 

Thanks for reading!
Lucy xx

P.S. Sorry - the end of the first quarter is coming so I've had a bunch of stuff for school, but soon I'll get back to blogging more often/reading y'all's blogs!


Grunge Nail Fail

Saturday, October 26, 2013

Hi!
Recently I've been seeing a lot of grunge nail art out there (see Hey, Darling Polish's version and Chalkboard Nails' version). I think it looks really interesting! My version... well... you can see for yourself. 


Grungy? Yes. But as I was aiming for something more like Chalkboard Nails' version (see link above), it looked a little too grungy. 


To get the streaky look, I just wiped most of the polish off the brush, then swiped it down my nail. It made it look quite grungy, but it was hard to control how much polish got on your nail, which led to me putting on way too much black polish.


This last photo shows it especially well -- I put WAY too much black on.

I guess it still looks interesting, but it's definitely not what I was aiming for... have you tried grunge nails? Have you had any bad nail fails lately? Let me know what you think in the comments!

Thanks for reading and have a great weekend!
Lucy xx

P.S. I was looking at my blog from a different computer today and it looked completely different... instead of light purple the accents were a bright fuchsia color! It displays fine on all my Mac stuff and on my HP laptop, but on certain computers it just looks.. weird. In my photos, my hands look super red! Does the blog look weird to you guys? And does anyone know how can I make it display consistently?

Neon & Nude Nails

Thursday, October 24, 2013

Hi!

Today I have a nude/neon combination to share with you (do you like the alliteration in the post title? :D). These are my sister's nails, and they're TINY (note the size of the SV bottle compared to her hand) so it's always really difficult to come up with a good design for them!
But this week I just decided to take the plunge and do something like I would do on my own nails. This design was inspired by Dipped in Lacquer's post (link).


I used Sephora by OPI Neutral Beauty for the base, then added Sally Hansen Mellow Yellow (thumb), Deborah Lippmann Lara's Theme (index), Sephora by OPI It's Totally Karma (middle), some polish I don't remember (ring) and a Love & Beauty unnamed red polish (pinky). 

I used a striping brush for all the details. It was actually a lot quicker than I expected!


I think my sister is better at posing her hand than I am... 


Leave a comment and let me know what you think :) 

Thanks for reading,
Lucy xx


Rilakkuma Nails

Monday, October 21, 2013

Hi!

Today I tried the most challenging nail art I've tried yet (in my opinion) -- Rilakkuma nails!

My friend suggested these a little while ago. While I don't really know who Rilakkuma is, but he looked cute, so... I mean, bears are always good. Right?

Rilakkuma nails

I started with a base of Sephora by OPI It's Totally Karma, then added the dots on the index and ring with Revlon Spirit. Then I drew the bears with acrylic paint and outlined them in Wet n Wild Black Creme (I didn't have any black acrylic paint!). 

Rilakkuma nails

I would say that they came out better than I expected, but far from perfect. Far from "good", now that I think about it! The facial expressions are just... odd and the heads are a little misshapen. The one on my middle finger looks so disapproving!
Oh, well -- I'll have to give this another try in a couple years when my nail art skills will *hopefully* be much better.

Rilakkuma nails

For reference, here's what Rilakkuma is actually supposed to look like:


Have you ever tried character-themed nails? How did they come out? Facial expressions are just so difficult to do, aren't they?

Lastly, I'm looking for guest posters! I'm not going away or anything, but I think it would be a fun thing to do :) Check out the "Be My Guest" page for more information!

Let me know what you think, and thanks for reading!
Lucy xx

Saran Wrap Nails

Friday, October 18, 2013

Hi!

This week I recreated some nail art my friend (hi, Jasmeen!) did! I loved the colors and the design, so I decided to recreate it on my nails as well!

Jasmeen's Nails

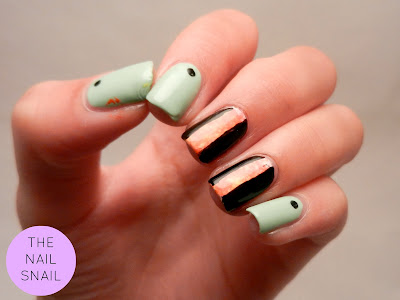
For my thumb, index, and pinky, I started with a base of Sally Hansen Mint Sorbet and added the dots with a bobby pin and Wet n Wild Black Creme
For my middle and ring fingers I started with a white base (Revlon Spirit) then used the saran wrap technique with JINsoon Coral Peony, Deborah Lippmann Lara's Theme, and Sally Hansen Mellow Yellow. Then I freehanded the black on either side with Wet n Wild Black Creme. (this was with my non-dominant hand, guys!)

nail art

(apologies for the gross brown/white paint on my hand, I was using brown acrylic paint and forgot to wash it off)

nail art

This was my first time using the saran wrap method and I thought the technique produced cool results! I'm trying to think of more ways I can use this... ideas? I liked the Crumpet's candy striped nails and although she used a different technique I think it would work with the saran wrap method as well!

Do you like this? Do you think the saran wrap/black nails go with the mint green nails, or is it not your kind of thing? Tell me what you think :)

Thanks for reading! And thanks Jasmeen!
Lucy xx


Tribal Nails (take 2)

Tuesday, October 15, 2013

Hi!

Today I did another take on tribal nails! (take 1 is here) Last time they were more classic; this time I decided to try something new! 

tribal nails

These were inspired Nailed It's tutorial, which I found through Nail Polish Society's version.

I was intending to recreate it exactly, but I realized that I don't actually have a real red. Weird. I think I always assumed I had one and so I never bought one... okay, maybe I do need a nail polish organizing app.

Anyways. I started with a base of Deborah Lippmann Lara's Theme (orange and is a superbly wonderful polish, but my camera couldn't capture its true brightness). Then I marked out a triangle on the nail with tape and sponged a gradient with Sally Hansen Blue Me Away, Sephora by OPI It's Totally Karma, and Sally Hansen Mellow Yellow. Lastly, I added the black stairstep things with Wet n Wild Black Creme (for a better explanation I recommend Nailed It's tutorial). 

Ta-daaa!

tribal nails

...yeah, my freehand skills could use some work. But on the plus side, I finally stopped making everything matte!

Which do you prefer, classic tribal nails or... weird ones? Let me know what you think!

Thanks for reading!
Lucy xx

Rainbow Waterfall

Sunday, October 13, 2013

Hi!

This week I tried my very first waterfall!

waterfall nails

It looks simple, but making the strokes the right lengths was actually a lot harder than I thought!

I was originally planning to go with a blue-and-white color scheme, but I decided rainbow would be more fun. What do you think? 

waterfall nails

I started with a base of Revlon Spirit, then added the stripes with a small striping brush, using Deborah Lippmann Girl on Fire (red) & Lara's Theme (orange), Sally Hansen Mellow Yellow & Blue Me Away, and Sephora by OPI It's Totally Karma (green). 

And of course, I had to use my matte topcoat! 

waterfall nails

waterfall nails

What do you think of these? Fun? Weird? 
Do you prefer them matte or glossy? I'm not sure, but I think I like glossy better for these. 

Thanks for reading!
Lucy xx


Black and White Skittlette

Monday, October 7, 2013

Hi!

This week on my dominant hand I did a simple black and white skittle design.


On my pointer finger I did black and white stripes with Sally Hansen White On and WnW Black Creme and a small triangle of gold glitter with Deborah Lippmann Glitter and Be Gay. This nail was inspired by Chalkboard Nails' simple tribal design (here). 
On my middle finger I did matte black with glossy stripes;
on my ring finger I did simple black and white stripes;
and on my pinky finger I did plain gold glitter. 

This photo below is a little confusing because I'm holding the matte topcoat bottle but it really is glossy. Also, maybe it's the lightbox? but my nails just don't look that glossy even though I did use Seche Vite... 


This was a really simple mani to do. The only problem was that I messed it up and had to start over again twice because I didn't wait long enough for my white base to dry before putting on the tape! Grrr...

And because I just got matte topcoat, of course I had to try it matte!


Which do you like better, matte or glossy? Once again, I think I prefer it matte.


Hope your Monday wasn't too Mondayish, and thanks for reading!
Lucy xx


Sponged Flower Nails

Sunday, October 6, 2013

Hi!

This week I did more flower nails! I don't know why I keep doing flower nails... I must be in a flowery mood or something...


I started with a base of my go-to white, Revlon Spirit (long tangent: I picked this up recently at a sale and discovered it's a much better white than Sally Hansen White On -- it dries about 3x faster for one thing). Then I drew stems of green with Sally Hansen Mint Sorbet and lastly sponged on "circles" of purple (BK #26). 


 In the first two photos, I used a regular glossy top coat (Seche, naturally). But another thing I picked up in the sale was a MATTE TOPCOAT! 

Of course, I had to try it out:


Which do you prefer, glossy or matte? I feel like these photos don't do a great job of showing the difference between the two... but personally I'm leaning towards matte, but that might just be because I'm in what I've decided to call my "matte honeymoon phase" where I'm basically like:

And one last thing -- I finally got my act together and built a lightbox! My photos are SO MUCH BETTER! I hope you think so too! The one thing I have trouble with is that I don't have a daylight light bulb, so my hands look a little reddish and the background looks a little purplish. 
I'm probably going to put a bunch of rambles about my DIY lightbox in the next couple of posts so I won't say much now. 

Thanks for reading!
The Nail Snail xx

Nude Dotticure

Thursday, October 3, 2013

Hi!

Happy Thursday! This week on my left hand I decided to do a simple dotticure (at first I tried some nail art, but that was a complete failure... I wish I had taken photos so you could laugh at them!).


This was a really quick and simple design to do. I started with a base of Sephora by OPI Neutral Beauty, then added dots in Sephora by OPI Mood Ring (green), Sally Hansen Mellow Yellow, and Jin Soon French Lilac


What do you think of this design? Do you like the colors, or are they too mismatched? And what do you think of Neutral Beauty (I'm still undecided as to whether it's more of a nude or a brown)? 

Thanks for reading!
The Nail Snail xx

P.S. I accidentally deleted ALL of your lovely comments from about a month ago until now *sob* ARGH! Lesson learned: don't mess with your blog's settings. You guys should leave lots of comments now to make up for the deleted ones :) 


Tree Nails

Tuesday, October 1, 2013

Hi!

I've been admiring nails based on the Arizona tea bottle tree thing for a while (if that made any sense). I also wanted to swatch Fake It Til You Make It (of the Deborah Lippmann Jewel Heist collection). I feel like pure swatching posts are kind of boring to write (I like reading them -- I just don't like writing them for some reason!) so I combined the swatches and did some Arizona tea nail art on top of them!

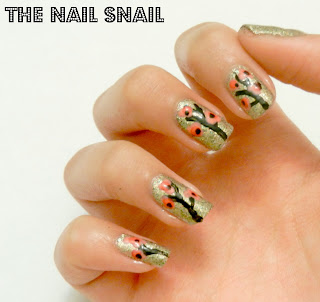
tree nail art

I used WnW Black Creme and a small striping brush to do the trunks, and then Jin Soon Coral Peony and Tea Rose for the flowers.

I have to admit that these didn't come out quite like I originally wanted. My trunks were kind of wobbly and the black dots in the middle of the flowers were SUPPOSED to be stamens...whoops... But even though they weren't quite what I wanted, I still like them!

I think it's time to acquire a black striper, though. Striping brushes are just difficult to work with. Plus, mine were of the cheap variety so they're losing hairs and generally falling apart (although I guess I can't complain, $1.36 was a good price for three brushes).  

tree nail art

And since I also did these to see what Fake It Til You Make It looks like, here it is (2 coats, no base color): 

fake it til you make it

It's a mix between a glitter and a shimmer. It dries textured, like glitter, but as you can see it's not really a glitter polish (its finish reminds me of washi paper!). It has these green flecks that I like, but it makes the polish seem more green and money-ish than warm and gold-colored. I guess the flecks of green are supposed to make it match with the collection, but it's a bit too green for me!

Do you like the tree nails? (see Cutepolish's tutorial if you do!) And would you recommend a black striper, or are detail brushes just as good?

Anyways, that's it for today! Hope your weeks are going well -- we're halfway to the weekend (almost)! Thanks for reading!

The Nail Snail xx